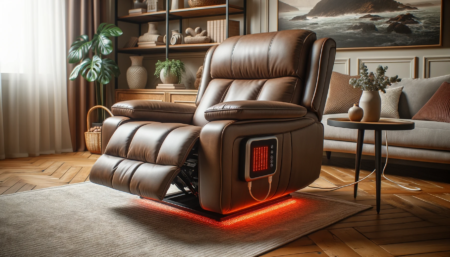
A recliner chair cover can protect your investment, cover up worn-down chairs, and is easy to clean. You might wonder, A well-installed cover not only breathes new life into your recliner but also ensures its longevity, saving you dollars in the long run.
Imagine your recliner as the throne of comfort in your home. Over time, it faces wear and tear, spills, and stains. Here’s where recliner chair covers come to the rescue!
In this guide, we’ll take you step by step through the installation process, so you can achieve that polished, professional look.
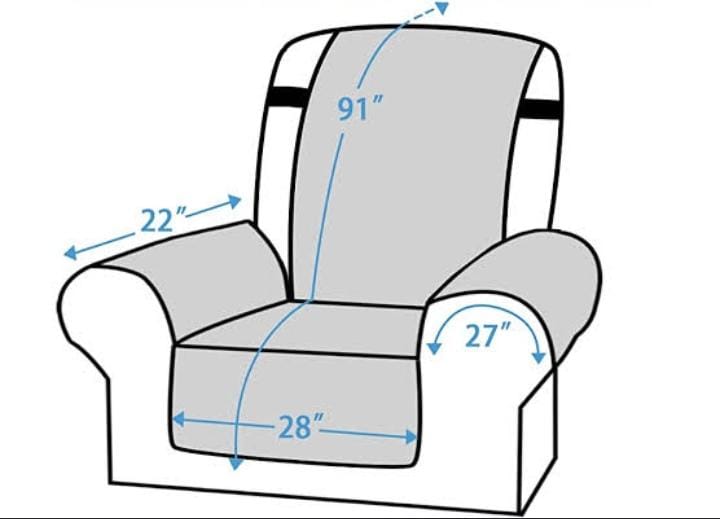
Step 1: Recliner Measurements
Taking accurate measurements of your recliner is essential when purchasing a recliner chair cover to ensure a proper fit.
Measure the seat width
Find the widest point of the seat cushion. Measure from the outside edge of one armrest to the outside edge of the other armrest. This measurement will give you the width of the seat.
Measure the seat depth
Measure from the front edge of the seat cushion to the backrest. This measurement will give you the depth of the seat.
Measure the backrest height
Measure from the top of the backrest down to the top of the seat cushion. Make sure to measure at the highest point on the backrest.
Measure the armrest width
Measure the width of one armrest from the outside edge to the inside edge. Repeat this for the other armrest.
Measure the armrest height
Measure from the top of the armrest down to the top of the seat cushion.
Measure the recliner’s height
Measure from the floor to the highest point on the backrest to determine the overall height of the recliner.
Measure any additional features
If your recliner has any unique features such as a headrest, footrest, or reclining mechanism, measure these as well.
Note any irregularities
Take note of any irregular shapes, curves, or contours on your recliner, as these may affect the fit of the chair cover.
Record your measurements
Write down all the measurements you’ve taken, ensuring that you’ve recorded them accurately.
Step 2: Choose Right Fabric
Think of the cover material as the essence of your recliner’s new identity. Different fabrics offer various benefits, from softness and comfort to durability and ease of cleaning. Search the world of materials, considering factors like the room’s temperature, the amount of use the chair sees, and any allergies among the household members.
Vinyl covers are easy to clean and waterproof. However, they can be less comfortable than fabric covers, and they may not breathe as well.
Leather covers are luxurious and durable. However, they can be expensive, and they may not be suitable for all climates.
Polyester is a good choice for recliner chair covers because it is durable, easy to clean, and affordable. It is also stain-resistant and fade-resistant. However, it is important to note that polyester is not as breathable as some other fabrics, and it is a flammable fabric.
Cotton is a good choice for recliner chair covers because it is soft, breathable, comfortable, durable, and easy to care for. However, it is important to note that cotton can shrink and is not as stain-resistant as some other fabrics.
Step 3: Preparing Recliner Chair:
Before you begin the process of installing a recliner chair cover like a pro, it’s essential to prepare your recliner properly. Taking these steps will ensure a smooth and effective installation:
Clean and Dust the Chair
Start by thoroughly dusting your recliner chair with a clean, dry cloth or a duster. Pay attention to all the nooks and crannies, including creases and seams, where dust can accumulate.For fabric or upholstered recliners, use a vacuum cleaner with an upholstery attachment to remove any embedded dust and debris.
If there are any stains or spills on the recliner’s fabric, use an appropriate fabric cleaner or upholstery shampoo to spot-clean those areas. Allow them to dry completely before proceeding.
Smoothing Out Wrinkles and Creases
Smooth out these tiny imperfections with a careful hand, using a steamer or iron if necessary (and safe to do so). This step is like ironing a shirt before a big interview; it’s all about presenting the best version to the world. Be sure to use the lowest heat setting to avoid damaging the fabric of the recliner.
Step 4: Installing The Cover
Now that you’ve properly prepared your recliner chair, it’s time to install the cover with precision. Follow these steps to achieve a snug and professional fit:
Starting at the Bottom
Begin at the bottom of the recliner by covering the footrest area. Drape the cover over the footrest, making sure it aligns with the edges. Secure the cover in place by tucking excess fabric into the crevices around the footrest. Smooth out any wrinkles or folds for a neat appearance.
Continue to tuck any excess fabric under the footrest and along the sides of the chair, maintaining a tight fit. Ensure the fabric follows the contours of the footrest seamlessly.
Moving to the Seat Area
Move up to the seat area and position the cover over the seat cushion. Align it with the edges of the seat. Smooth out the cover to eliminate wrinkles and ensure it lays flat and even over the cushion.
Tuck the sides of the cover into the gaps between the seat cushion and the armrests. This will help keep the cover in place and provide a tailored appearance.
Covering the Backrest
Extend the cover up and over the backrest of the recliner. Ensure it drapes evenly and follows the contours of the backrest.
Tuck any excess fabric into the crevices around the backrest and arms. Pay attention to achieving a snug fit while maintaining a smooth appearance.
Step 5: Securing the Cover
Now that the cover is in place, secure it further to prevent shifting and maintain its pristine appearance:
Using Elastic Bands
If your cover has elastic bands, stretch them around the base of the recliner to hold the cover in position.
Ties and Fasteners
Tie any provided ties or fasteners to anchor the cover securely. These may attach to various points on the recliner.
Velcro Strips
If your cover has Velcro strips, press them together to create a secure closure along the seams.
Zippers (if applicable)
If your cover includes zippers, zip them closed to ensure a tight fit. Be cautious not to force the zipper to prevent damage.
Step 6: Final Touches
Eliminating Bubbles and Bunching
Even the finest covers might form bubbles and bunch up in places.Gently smooth out these areas, running your hands along the fabric to create a surface as smooth and inviting as a serene, tranquil lake. Each bubble banished, each bunch smoothed, brings you closer to a recliner that beckons invitingly, promising comfort enveloped in elegance.
Adjusting for Reclining Functionality
If you have a reclining recliner chair, you’ll need to adjust the cover for reclining functionality. This means making sure that the cover is not too tight or too loose when the recliner is reclined.
To adjust the cover, try reclining the recliner chair and then sitting in it. If the cover is too tight, you can loosen the straps or ties. If the cover is too loose, you can tighten the straps or ties.
Insider Secrets: Pro Tips & Tricks
As we approach the finale of our recliner transformation journey, let’s delve into the treasure trove of professional wisdom. These insider secrets will empower you to navigate through common challenges, enhance the aesthetic appeal, and achieve a look that whispers (or perhaps exclaims) perfection!
Common Installation Issues: Quick Fixes
| Issues | Fixes |
| Cover doesn’t fit properly | Measure your recliner accurately Choose the right cover material Use pins or clips to secure any areas that need extra support |
| Cover slips or bunches up | Smooth out bubbles or bunching by hand. Enhance adherence with fabric softener. Employ a steamer to eliminate wrinkles and creases. |
| Difficulty in Securing Covers | Velcro strips, ties, or elastic bands can be used to secure the cover firmly to the chair. |
| Cover Collects Lint and Pet Hair | Regularly use a lint roller or handheld vacuum to remove unwanted lint and hair. Choosing a cover material that is less prone to attracting lint and hair, like microfiber or leather, can also mitigate this issue. |
Conclusion
Installing a recliner chair cover like a pro can be challenging, but with the right tips and tricks, it can be done with ease. By following the steps outlined in this guide, you can celebrate your installation victory, enjoy comfort with confidence, and experiment and personalize your cover to your liking.
Some pro tips and tricks include using a fabric softener to help the cover adhere better, smoothing out any bubbles or bunching with your hands, and using Velcro instead of a hemmed skirt for a clean and modern look.
Additionally, utilizing accessories such as throw pillows or blankets can enhance the appeal of your cover, and expert advice such as starting at the top of the chair and working your way down can help you achieve a flawless look. By implementing these tips and tricks, you can ensure that your recliner chair cover looks great and stays in place, providing maximum protection for your chair.
Still Have Some Queries? This Might Help!
Your journey with your recliner doesn’t end here; it merely transforms, opening up avenues for continuous improvement and personal expression. With the skills and tips you’ve garnered, every cover installation in the future becomes a joyful act of creation, bringing comfort, style, and personal satisfaction into your home.
Why should I install a recliner chair cover?
Installing a recliner chair cover can help prolong the life of your chair by preventing damage from spills, pet hair, and everyday use. It also gives your chair a fresh, updated look without the need for expensive reupholstering.
How do I choose the right recliner chair cover?
Consider the size, style, and material of the cover. Measure your chair accurately to ensure a proper fit. Choose a cover that matches your décor and is made from a durable, easy-to-clean fabric.
Do I need any special tools or equipment to install a recliner chair cover?
Typically, you won’t need any special tools. However, having someone to assist you can make the process easier. Some covers may come with elastic straps or fasteners for a snug fit.
Can I wash and maintain my recliner chair cover easily?
Most recliner chair covers are machine washable, making maintenance simple. Follow the care instructions provided with the cover to ensure its longevity.